6 July 2014

Steps to Created Subscriber for Snapshot Replication in sql server

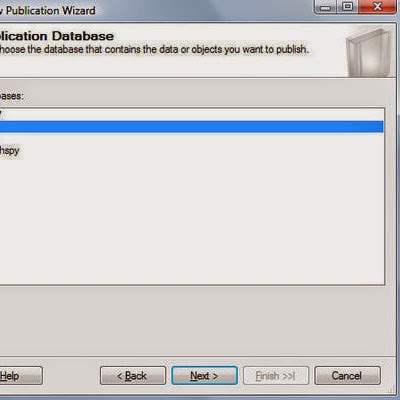
Once you've configured a distributor and created a publication, the last step in configuring SQL Server replication is to create a subscriber who will receive publication updates from the publisher. In this tutorial, we walk through the process of subscribing to a publication, step-by-step. The process may be accomplished either at the publisher or the subscriber


Steps to Create Subscriber 
  • Open SQL Server Management Studio, connect to the publishing server and expand the Replication folder.
  • Expand the Local Publications folder inside of the Replication folder.
  • Right-click on the publication that you wish to create a subscription to and choose New Subscription from the pop-up menu.
  • The New Subscription Wizard will open. Click Next to advance past the initial screens that welcome you to the wizard and confirm the publisher and publication you selected.
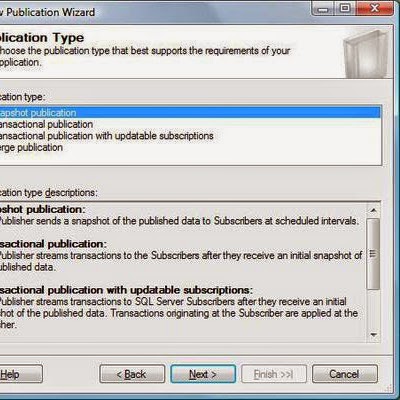
  • Select whether you wish to create a push or pull subscription and click Next to continue. In a push subscription, the Distribution Agent will run on the distributor and changes will be sent out to the subscriber as they occur. In a pull subscription, the Distribution Agent will reside on the subscriber and will check in with the publisher periodically to check for available updates.
  • In the next window, select the subscriber server(s) by checking the box to the left of each server you wish to receive the subscription. If the server you wish to use is not listed, click the Add Subscriber button to add it to the list. You should also select the subscription database for each subscriber using the pull-down menu to the right of each selected server. When you are finished, click the Next button to continue.
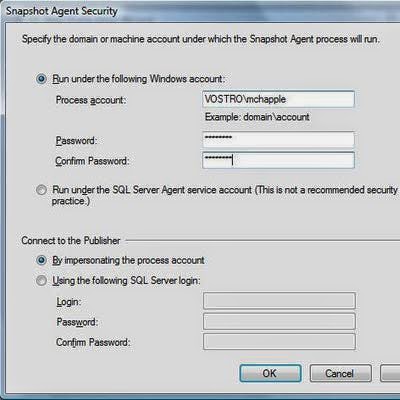
  • Click the ellipses ("...") button to configure Distribution Agent Security. You will be asked to provide account information that will be used to authenticate the subscription connection. When you are finished, click the Next button to continue.
  • Select a schedule for the Distribution Agent if you wish to vary from the default value of continuous distribution. Click the Next button to continue.
  • Select an initialization time if you wish to vary from the default value of immediately. Click the Next button to continue.
  • Click Next to accept the default value of creating the subscription immediately. Your alternative is to create a script that may be run at a later date.
  • Click the Finish button to create the subscription. SQL Server will provide a status window informing you of its progress creating the new subscription.


Steps to create publication in snapshot replication

you can then use SQL Server Management Studio to create publications that subscribing servers may receive. Each publication contains a collection of database objects that will be replicated to all subscriber servers.

With SSMS open, expand the Replication folder of the publisher and right-click on Local Publications. Then select New Publication from the pop-up menu.

Choose the Publication Database


Choose Publication Type


As shown in the figure above, select the publication type you wish to use:
  • Snapshot publication
  • Transactional publciation
  • Transactional publication with updatable subscriptions
  • Merge publication

Press the Next button to continue.

Choose Article to Publish


Next, you must select the specific articles (objects) within the database that you wish to include in the publication. These are the objects that will be replicated across all subscribers. You may select any tables, user-defined functions or stored procedures. Once you've selected the items you wish to publish, click the Next button to continue

Configuring the Snapshot Agent


You'll want to advance past the Filter Table Rows screen, unless you wish to limit the data included in the publication. On the next screen, you'll have the option to create a snapshot immediately and/or create a schedule for future snapshots using the Snapshot Agent. 

Click on the Security Settings button to provide the account and connection details for the Snapshot Agent, as shown above. Once you've provided the details, click OK to close the Snapshot Agent Security screen and click the Next button to continue.

Finishing Up


Click through to the final screen of the wizard, which allows you to set the publication name. Once you've provided a descriptive name, click the Finish button to create the publication. You'll see the status window shown above while SQL Server creates your new publication.


Steps to create Distubutor for snapshot replication

SQL Server's snapshot replication technology allows you to automatically transfer information between databases to keep them synchronized. In this article, we look at the first step of the snapshot replication process: creating the replication distributor
  • Open SQL Server Management Studio and connect to the database server that you wish to serve as the distributor.
  • Right-click on Replication and choose Configure Distribution from the pop-up menu.
  • Click Next to advance past the welcome screen.
  • Select " will act as its own Distributor; SQL Server will create a distribution database and log", then click the Next button to continue.
  • Click the Next button to accept the default setting that SQL Server Agent should start automatically.
  • Provide a location where SQL Server should store the snapshot replication files by providing either a local folder path or a UNC share name, then click Next to continue.
  • Accept the default name and paths for the distribution database by clicking the Next button.
  • If servers other than the distribution server will publish to this distribution server, provide their information and then click the Next button to continue.
  • Click the Next button to advance to the confirmation screen.
  • Review the choices presented in the Complete the Wizard screen and click Finish to configure your distributor.
 

29 May 2014

Different Dialog boxes in sql server analysis service

Use the Storage Options dialog box in SQL Server Data Tools (SSDT) to specify custom storage mode, proactive caching, and notification options for dimensions, cubes, measure groups, and partitions. You can display the Storage Options dialog box in SQL Server Data Tools (SSDT) by clicking Options on the Storage Settings dialog box.

For more information about the Storage Settings dialog box

The Storage Options dialog box contains the tabs listed in the following table.
Page
Definition
General
Use the General tab to specify storage and proactive caching settings.
Notifications
Use the Notifications tab to specify the notification method and related settings.

Adding Cube Dialog Box

       Use the Add Cube Dimension dialog box in SQL Server Data Tools (SSDT) to add a reference to a database dimension to a cube. You can display the Add Cube Dimension dialog box by doing one of the following:
  • Click Add Cube Dimension in the Toolbar pane on the Cube Structure or Dimension Usage tab in Cube Designer.
  • Right-click the Dimensions pane on the Cube Structure tab in Cube Designer and select Add Cube Dimension from the context menu.
  • Right-click the Grid pane on the Dimension Usage tab in Cube Designer and select Add Cube Dimension from the context menu.
Note1:
          Each cube dimension can have only one relationship to a measure group. However, you can create more than one cube dimension and add it to the cube, if the database dimension on which the cube dimension is based is related to measure groups through more than one relationship in the data source view.  
         
         Such dimensions are referred to as role-playing dimensions and commonly occur with time dimensions.

Options


Select dimension

Select an existing database dimension to add a cube dimension based on it to the selected cube. Multiple cube dimensions can be defined from the same database dimension.

Adding Table Dialog Box

Use the Add Table dialog box in SQL Server Data Tools (SSDT) to add a table while creating a query in the Create Named Query dialog box, Create Polling Query dialog box, or Create Processing Query dialog box. 

rm
Definition
Tables
Use the Tables tab to display and select a table to add.
Views
Use the Views tab to display and select a view to add.
Functions
Use the Functions tab to display and select a function or stored procedure to add.
Synonyms
Use the Synonyms tab to display and select a synonym to add.
Refresh
Click to reload all of the tabs on the dialog box.
Add
Click to add the currently selected item.


You can display the Add Table dialog box in SQL Server Data Tools (SSDT) by clicking Add Table from the Toolbar pane of the Create Named Query dialog box, Create Polling Query dialog box, or Create Processing Query dialog box.


Administering remote partitions

Analysis Services supports both parallel and sequential processing of remote partitions. The master database, where the partitions were defined, coordinates the transactions among all the instances that participate in processing the partitions of a cube. Processing reports are then sent to all instances that processed a partition.

A cube that contains remote partitions can be administered together with its partitions on a single instance of Analysis Services. However, the metadata for the remote partition can be viewed and updated only on the instance of Analysis Services where the partition and its parent cube were defined. The remote partition cannot be viewed or updated on the remote instance of Analysis Services.

Note:

Although databases dedicated to storage of remote partitions are not exposed to schema row sets, applications that use Analysis Management Objects (AMO) can still discover a dedicated database by using the XML for Analysis Discover command.


Any CREATE or DELETE command that is sent directly to a dedicated database by using a TCP or HTTP client will succeed, but the server will return a warning indicating that the action may damage this closely managed database.

Remote Partitions

When partitioning a measure group, you can configure a secondary database on a remote Analysis Services instance as partition storage.

Remote partitions for a cube (called the master database) are stored in a dedicated Analysis Services database on the remote instance of Analysis Services (called the secondary database).


A dedicated secondary database can store remote partitions for one and only one master database, but the master database can use multiple secondary databases, as long as all the secondary databases are on the same remote instance of Analysis Services. Dimensions in a database dedicated to remote partitions are created as linked dimensions.

Before you create a remote partition, the following conditions must be met:
  • You must have a second Analysis Services instance and dedicated database to store the partitions. The secondary database is single-purpose; it provides storage of remote partitions for a master database.
  • Both server instances must be the same version. Both databases should be the same functional level.
  • Both instances must be configured for TCP connections. Analysis Services does not support creation of remote partitions by using the HTTP protocol.
  • Firewall settings on both computers must be set to accept outside connections. For information about setting the firewall
  • The service account for the instance running the master database must have administrative access to the remote instance of Analysis Services. If the service account changes, you must update permissions on both the server and database.
  • You must be an Analysis Services administrator on both computers.
  • You must ensure your disaster recovery plan accommodates backup and restore of the remote partitions. Using remote partitions can complicate backup and restore operations. Be sure to test your plan thoroughly to be sure you can restore the necessary data.

Configure remote partitions

Two separate computers that are running an instance of SQL Server Analysis Services are each required to create a remote partition arrangement that designates one computer as the master server and the other computer as the subordinate server.

The following procedure assumes that you have two server instances, with a cube database deployed on the master server. For the purposes of this procedure, the cube database is referred to as db-master. The storage database containing remote partitions is referred to as db-storage.

You will use both SQL Server Management Studio and SQL Server Data Tools (SSDT) to complete this procedure.

Note:

Remote partitions can be merged only with other remote partitions. If you are using a combination of local and remote partitions, an alternative approach is to create new partitions that include the combined data, deleting the partitions you no longer use.

Specify valid server names for cube deployment (in SSDT)
  • On the master server: In Solution Explorer, right-click the solution name and select Properties. In the Properties dialog box, click Configuration Properties, then click Deployment, and then click Server and set the master server's name.
  • On the subordinate server: In Solution Explorer, right-click the solution name and select Properties. In the Properties dialog box, click Configuration Properties, then click Deployment, and then click Server and set the subordinate server's name. 

Create and deploy a secondary database (in SSDT)
  • On the subordinate server: Create a new Analysis Services project for the storage database.
  • On the subordinate server: In Solution Explorer, create a new data source pointing to the cube database, db-master. Use the provider Native OLE DB\Microsoft OLE DB Provider for Analysis Services 11.0.
  • On the subordinate server: Deploy the solution.


Merging Using XMLA

If partitions have the same aggregation design and structure, you can merge the partition by using the Merge Partitions command in XML for Analysis (XMLA). Merging partitions is an important action to perform when you manage partitions, especially those partitions that contain historical data partitioned by date.

For example, a financial cube may use two partitions:

One partition represents financial data for the current year, using real-time relational OLAP (ROLAP) storage settings for performance.

Another partition contains financial data for previous years, using multidimensional OLAP (MOLAP) storage settings for storage.

Both partitions use different storage settings, but use the same aggregation design. Instead of processing the cube across years of historical data at the end of the year, you can instead use the Merge Partitions command to merge the partition for the current year into the partition for previous years.

This preserves the aggregation data without requiring a potentially time-consuming full processing of the cube.

Specifying Partitions to Merge

When the Merge Partitions command runs, the aggregation data stored in the source partitions specified in the Source property is added to the target partition specified in the Target property.

To be successfully merged, the partitions specified in both the Source and Target must be contained by the same measure group and use the same aggregation design. Otherwise, an error occurs.

The partitions specified in the Source are deleted after the Merge Partitions command is successfully completed.

Note: The Source property can contain more than one partition object reference. However, the Target property cannot.