The main advantage of hosting service in IIS is that, it will automatically launch the host process when it gets the first client request. It uses the features of IIS such as process recycling, idle shutdown, process health monitoring and message based activation. The main disadvantage of using IIS is that, it will support only HTTP protocol.for instance to create service and host in IIS
Step 1:Start the Visual
Studio 2008 and click File->New->Web Site. Select the 'WCF Service' and
Location as http. This will directly host the service in IIS and click OK.

Step
2:
I have created sample Hello World service, which will accept name as input and
return with 'Hello' and name. Interface and implementation of the Service is
shown below.
IMyService.cs
[Service Contract]
public interface
IMyService
{
[Operation Contract]
string HelloWorld(string name);
}
MyService.cs
public class MyService :
IMyService
{
#region IMyService Members
public string HelloWorld(string name)
{
return "Hello " + name;
}
#endregion
}
Step 3: Service file (.svc)
contains name of the service and code behind file name. This file is used to
know about the service.
MyService.svc
<%@ Service Host Language="C#" Debug="true" Service="MyService" Code Behind="~/App_Code/MyService.cs" %>
Step
4:
Server side configurations are mentioned in the config file. Here I have
mention only one end point which is configured to 'wsHttpBinding', we can also
have multiple end point with different binding. Since we are going to hosted in
IIS. We have to use only http binding.
Web.Config
<system.serviceModel>
<services>
<service behavior Configuration="Service Behavior" name="MyService">
<endpoint
address="http://localhost/IISHostedService/MyService.svc"
binding="wsHttpBinding"
contract="IMyService">
<identity>
<dns value="localhost"/>
</identity>
</endpoint>
<endpoint address="mex"
binding="mexHttpBinding" contract="IMetadataExchange"/>
</service>
</services>
<Behaviors>
<Service Behaviors>
<behavior
name="Service Behavior">
<!-- To avoid disclosing metadata information,
set the value below to false and remove the
metadata endpoint above before deployment -->
<serviceMetadata
httpGetEnabled="true"/>
<!-- To receive exception details in faults for
debugging purposes, set the value below to true.
Set to false before deployment to avoid disclosing
exception information -->
<serviceDebug
includeExceptionDetailInFaults="false"/>
</behavior>
</service Behaviors>
</behaviors>
</system.serviceModel>
Note: You need to mention the service file name, along with the Address mention in the config file. IIS Screen shot

This
screen will appear when we run the application.

Step 5: Now we successfully hosted the service in IIS.
Next we have to consume this service in client application. Before creating the
client application, we need to create the proxy for the service. This proxy is
used by the client application, to interact with service. To create the proxy,
run the Visual Studio 2008 command prompt. Using service utility we can create
the proxy class and its configuration information.
svcutil
http://localhost/IISHostedService/MyService.svc

After
executing this command we will find two file generated in the default location.
•
MyService.cs - Proxy class for
the WCF service
•
output.config - Configuration
information about the service.
Step 6: Now we will start creating the Console
application using Visual Studio 2008(Client application).

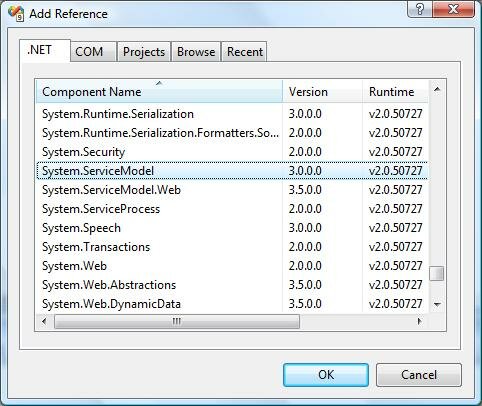
Step 7: Add the reference 'System.Service Model'; this
is the core dll for WCF.
Step
8: Create the object for the proxy class and call the
HelloWorld method.
static void Main(string[]
args)
{
//Creating Proxy for the MyService
MyServiceClient client =
new MyServiceClient ();
Console.WriteLine ("Client calling the service...");
Console.WriteLine (client.HelloWorld ("Ram"));
Console.Read ();
}
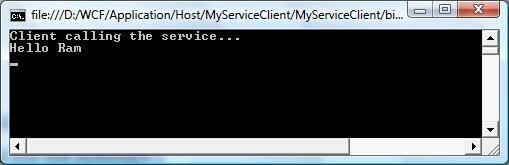
Step
9: If we run the application we
will find the output as shown below.
No comments:
Post a Comment