Once the cube design and development is complete, the next step is
to deploy the cube. When the cube is deployed, a database for the solution is
created in the SSAS instance, if not already present. Each of the dimensions
and measure group definitions are read, and data is calculated and stored as
per the design and configuration of these objects.
Once the cube is
successfully deployed, client applications can connect to the cube and browse
the cube data. We will deploy the cube we have developed and test connecting to
the cube. We might also face errors during deployment, and we will attempt
debugging and resolving these errors.
Deploying Cube using Deployment Wizard


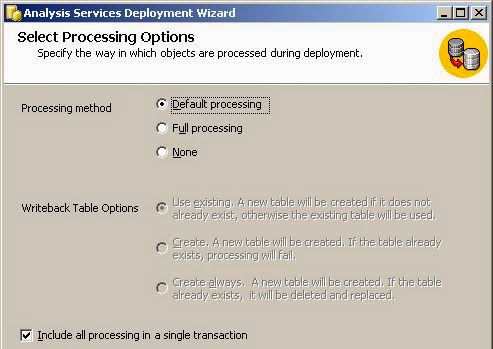
Select Processing Options
Confirm Deployment
Use this dialog to optionally specify whether to generate an XMLA script and save it in the folder of your choice. After clicking Next on this dialog the wizard will perform the deployment. It's a good idea to save the deployment script.

Deploying Cube using Deployment Wizard
You can launch the Deployment Wizard from the Analysis
Services program group within the Microsoft SQL Server program group. The
wizard requires that you be able to connect to the target deployment
server. To get around this you have to launch the wizard from the command
line and specify the options as shown below:
[PATH-TO-DEPLOYMENT-WIZARD]\Microsoft.AnalysisServices.Deployment
[PATH-TO-ASDATABASE-FILE] /d /o:[SCRIPT-FILE-PATH]
Options:
- /d is for disconnected mode meaning you will not be connecting to the target deployment server
- /o allows you to to specify the full path to the XMLA script file to be generated; this is required when you use the /d option
When you run the wizard from the command line with the
options shown above, the wizard does not step through a series of dialogs;
rather it simply generates the XMLA script file based on the files in your
project's bin folder as described above.
If you need to change anything
in the generated script you can open it up in Notepad or your favorite editor.
To get the location of the Deployment Wizard, you can
right click on it in the Microsoft SQL Server, Analysis Services program group,
then select Settings from the menu to get the folder for the Deployment
Wizard.
For a SQL Server 2005 32 bit default installation that folder is:
C:\Program Files\Microsoft SQL
Server\90\Tools\bin\VSShell\Common7\IDE
If you want to step through the wizard dialogs you can
launch the Deployment Wizard from the Analysis Services program group (or from
the command line without the /d and /o options) and you will be guided through
the following steps:
Specify Source Analysis Services
Database
Navigate to the [project
name].asdatabase file in the bin folder of your BIDS project:
Installation Target
Specify the target deployment server
and the name of the SSAS database on that server. Remember you must be
able to connect to the server. If you cannot connect to the server you
will have to specify something like localhost to get through the wizard.
Specify Options for Partitions and
Roles
After initial deployment, an
administrator may change the partitioning and/or roles and members. When
you deploy you have to decide whether or not to overwrite these settings based
on what you have in your SSAS project. The options shown below assume
that you do not want to overwrite those changes. However you can choose
the options that will make the deployed database match what's in your project.
Specify Configuration Properties
Administrators may make changes to various configuration properties after deployment and you may need to preserve those settings rather than overwrite them with what's in your project. In the case of data source connection strings, you make not even know the server names and credentials used to connect to them. Optimization settings will likely change as the size and usage of the SSAS database increases over time. Again the safest approach is to retain the settings rather than overwrite them.
You can specify whether to process the SSAS objects after deployment. Default processing allows SSAS to decide what needs to be done; Full processing can be used to process all objects. You can also choose not to process at all. You can select whether to perform the entire deployment in a single transaction. If this option is unchecked, each step of the deployment proceeds in its own transaction.
Confirm Deployment
Use this dialog to optionally specify whether to generate an XMLA script and save it in the folder of your choice. After clicking Next on this dialog the wizard will perform the deployment. It's a good idea to save the deployment script.
No comments:
Post a Comment