Steps To import some data using the
Import and Export Wizard, follow these steps.
- Launch SQL Server Management Studio and log in to your test server.
- Open a new query window.
- Select the master database from the Available Databases combo box on the toolbar.
- Enter this text into the query window: CREATE DATABASE HumanResources
- Click the Execute toolbar button to create a new database.
- Expand the Databases node in Object Explorer
- Right-click on the above database and select Tasks > Import Data.
- Read the first page of the Import and Export Wizard and click Next.
- Select SQL Native Client for the data source and provide login information for your test server.
- Select the AdventureWorks2008 database as the source of the data to import.
- Click Next.
- Because you're importing data, the next page of the wizard will default to connection information for the above database. Click Next.
- Select Copy Data from One or More Tables or Views and click Next. Note that if you only want to import part of a table you can use a query as the data source instead.
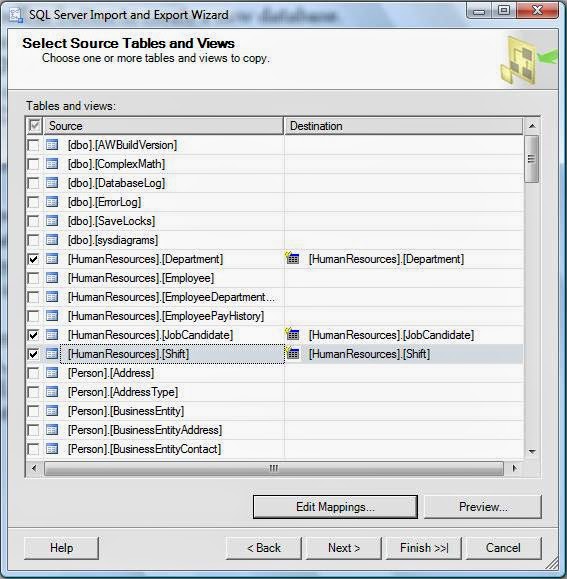
- Select the HumanResources.Department, HumanResources.JobCandidate and HumanResources.Shift tables, as show in
- Select the HumanResources.Shift table and click on the Edit Mappings button.
- The Column Mappings dialog box lets you change the name, data type, and other properties of the destination table columns.
- You can also set other options here, such as whether to overwrite or append data when importing data to an existing table. Click Cancel when you're done inspecting the options.
- Click Next.
- Check Execute Immediately and click Next.
- Click Finish to perform the import. SQL Server will display progress as it performs the import
- Click Close to dismiss the report.
- Expand the Tables node of the Chapter16 database to verify that the import succeeded.
No comments:
Post a Comment